
You press the power button of your ebike. Nothing happens. Not even a blink.
Your e-bike battery, the one that got you to work all week, suddenly acts like it’s completely dead. Your mind jumps straight to the worst option: a brand new battery, which can run anywhere from $400 to $900.
Take a breath first. There’s more than one reason an e-bike battery suddenly stops charging, and most of them have nothing to do with a truly dead pack. A dirty connector, a confused charger, or a battery that fell into a safety sleep can all look exactly like the real thing from the outside. None of those need a new battery. They need about ten minutes and a few simple checks.
This is the same process a bike shop runs before they ever tell you to buy anything. Grab your charger, your battery, and a cheap multimeter if you have one. Let’s figure out what’s actually going on and how to diagnose a dead e-bike battery.
Start Here: Your 5-Minute E-Bike Battery Troubleshooting Checklist
Work through these four checks in order. Most charging problems get solved before you even reach the last one.
Check the wall outlet first
This sounds too simple to matter, but it catches more riders than you’d think. Plug a lamp or your phone charger into that same outlet. If it doesn’t power on, you found your problem, and it has nothing to do with your bike. While you’re at it, skip any extension cords or power strips during testing — they can cause a small voltage drop that keeps your charger from getting full power.
Check the charger’s light
Plug the charger into the wall, but don’t connect it to the battery yet. Most chargers have a small LED that tells you a lot on its own:
- No light at all, even in a working outlet, usually means the charger has failed.
- A steady green light before you’ve connected the battery is normal. It just means the charger has power.
- Once it’s connected to the battery, red or orange usually means it’s actively charging.
- A flashing light is a warning sign. It can mean a charger fault, a battery fault, or a mismatch between the two. Don’t leave it plugged in and hope — move on to the next steps instead.
Check the connectors and charging port
Unplug everything and take a close look at the metal pins on your battery, plus wherever it plugs into the bike. You’re looking for dirt, moisture, or a white or greenish crust. That crust is corrosion, and it’s one of the most common reasons a charge won’t go through at all. Even a small amount can block the connection completely.
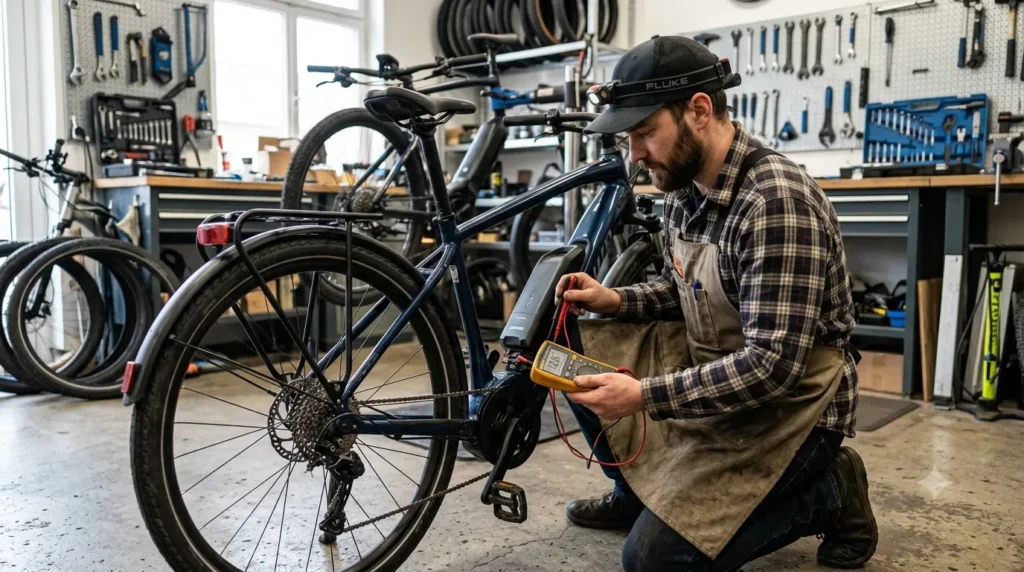
Test the battery’s voltage
This step tells you the most, and it only needs a cheap multimeter (about $15 to $20 at any hardware store). Set it to DC voltage, then touch the red probe to the positive terminal and the black probe to the negative one. Keep your hands dry, and don’t let the two probes touch each other while they’re connected. Compare your reading to the numbers below.
| Battery Voltage | Full Charge Should Read | Charger Output Should Read | Cause for Concern |
| 24V | About 29V | About 29V | Below 20V |
| 36V | 40–42V | About 42V | Below 30V |
| 48V | 52–54.6V | About 54.6V | Below 40V |
| 52V | 56–58.8V | About 58.8V | Below 43V |
If the charger’s own output matches its expected number, the charger is healthy. If the battery reads far below its resting number, that’s a real clue, but don’t jump to conclusions yet. A low reading has more than one possible cause, and the next section walks you through what to do with what you just found.

Repair or Replace? Here’s How to Decide
Once you know what the checklist turned up, this part gets simple. Read through these in order and stop at the first one that matches your situation.
- The outlet or another device also failed. This isn’t a battery problem at all. Fix the outlet, swap the extension cord, and get back to your day.
- The charger showed no light, or its own voltage tested at zero. Replace the charger, not the battery. A new charger runs $30 to $60, a small fraction of a new battery. This is one of the most common false alarms out there.
- You found corrosion, dirt, or a loose connection. Clean it up using the steps below and try charging again. This one fix solves a surprising number of “dead” batteries.
- The voltage is low, but the battery sat unused for weeks or was run all the way down. This is likely a safety feature doing its job, not a dead pack. Lithium batteries have a built-in brain called a BMS, short for battery management system. It shuts the pack down to protect the cells inside, and it can often be woken back up.
- Your battery is under two years old, and only one issue is showing up. Repair makes sense here. A new connector or a charger swap costs far less than a full replacement, and it can add years back onto a pack that’s otherwise healthy.
- Your battery is three years or older, has logged 500 to 1,000 charge cycles, or shows more than one problem at once — say, slow charging plus a shorter range plus random shutdowns. Replacement is usually the smarter call. At that point, the cells inside have likely aged out for good, and no amount of cleaning or resetting brings that capacity back.
- You notice swelling, a burning smell, or a cracked or leaking case. Stop right there. Skip every fix below and go straight to a professional. This is a safety issue, not a weekend project — we’ll cover exactly what that looks like further down.
If your e-bike is older, or you picked it up secondhand, it’s worth knowing what actually happens once a battery reaches true end of life so a dead pack never catches you off guard mid-ride.
Step-by-Step Fixes for the Most Common Problems
These five fixes solve the vast majority of charging complaints. Work through them in this order.
Clean corroded or dirty connectors
This is the single most common fix, and it costs nothing at all.
- Power off the bike and remove the battery.
- Look closely at the metal pins on the battery and the matching pins on the bike or charger.
- If you see a white or greenish crust, dip a cotton swab in rubbing alcohol or contact cleaner and gently wipe it away.
- Dry everything off completely with a clean cloth.
- Reseat the battery firmly until it clicks or locks into place, then try charging again.
Never scrape at corrosion with a metal tool. A bent or scratched pin just trades one problem for another.
Wake up a battery stuck in sleep mode
If your battery sat at a very low charge for weeks, or drained all the way to empty, its BMS may have locked the pack to protect the cells. This looks exactly like a dead battery from the outside, but it usually isn’t one.
- Connect the battery to its original charger.
- Leave it plugged in and undisturbed for 30 minutes, even if nothing seems to happen at first.
- Check for any sign of life: a light on the battery itself, a change in the charger’s LED, or a little warmth near the cells.
- If nothing changes after 30 minutes, check for a small reset button, often tucked under a rubber flap on the case. Hold it for 10 to 15 seconds, then plug the charger back in.
If this brings the battery back, let it charge all the way to full before your next ride. That resets the balance between cells and gives you an honest read on how much capacity is actually left.
Rule out a bad charger
Chargers fail more often than batteries do, mostly because they get tossed in bags, left outside, and stepped on.
- Look over the whole cable for fraying, bare wires, or a bent plug.
- If you have a multimeter, plug the charger into the wall by itself and test its output against the chart above.
- No multimeter handy? Borrow a compatible charger from a friend or shop and try it on your battery instead.
- If a different charger brings your battery back to life, the original charger was the problem all along, not the battery.
Only ever use a charger that matches your battery’s exact voltage. A mismatched charger can cause real, permanent damage, not just a failed charge.
Check for a blown fuse
Some e-bike batteries have a small fuse built in, sometimes behind an external panel and sometimes sealed inside the case. A power surge or a mismatched charger can blow that fuse to protect the cells behind it.
Look your battery over for a small door or panel, sometimes labeled “fuse.” If you find one and you’re comfortable with basic electrical work, swapping it is a cheap, five-minute fix. If the fuse is sealed inside the casing, leave this one to a shop — opening a battery case yourself risks damaging the cells or the seal that keeps moisture out.
Warm up a cold battery (or cool down a hot one)
Lithium batteries are picky about temperature, and this trips up more riders in winter than almost anything else on this list. Charging a battery that’s near freezing can cause permanent damage, so most batteries simply refuse to charge at all until they warm back up.
- If your battery just came in from the cold, bring it inside and let it sit for one to two hours before you plug it in.
- If you just finished a hard, hot ride, give the battery 20 to 30 minutes to cool down first.
- Store your battery indoors at room temperature whenever you’re not riding, especially through the winter months.
This isn’t a sign that anything is actually wrong with your battery. It’s the battery protecting itself, and it will charge normally again once it reaches a normal temperature.

When to Stop Troubleshooting and Call a Shop
Most charging problems get solved with the steps above. A few signs, though, mean it’s time to stop and hand things to a professional:
- Swelling, or a puffy, misshapen case. This means gas has built up inside from a chemical breakdown, and it’s a real fire risk.
- A burning smell, smoke, or noticeable heat coming from the battery at any point.
- Cracks, dents, or leaking fluid anywhere on the casing.
- The voltage drops fast under load, even though it reads fine while just sitting there.
- You’ve worked through every step above and nothing changed.
None of these are DIY situations, even for a confident home mechanic. A shop can run a proper load test on the pack and tell you, with real certainty, whether repair or replacement is the smarter move. Expect a diagnostic fee in the $20 to $50 range at most shops, usually credited toward the repair if you move forward.
If replacement turns out to be the answer, look for a pack that matches your bike’s exact voltage, capacity, and connector type. Most replacements are built around one of two cell types: the newer 21700 cells, which pack more capacity into the same size case, or the older, well-proven 18650 cells that have powered e-bikes for years. Either one works well as long as the voltage, capacity, and connector all match what your bike needs.
Frequently Asked Questions
Why is my e-bike battery not charging?
The most common reasons are a bad outlet, a failed charger, dirty or corroded connectors, or a battery management system that’s locked the pack for safety. Rule out those four before you assume the battery itself is finished.
Can a dead e-bike battery be fixed?
Often, yes. If the real cause is corrosion, a bad charger, or a battery that’s gone to sleep from sitting too long, the fix takes minutes and costs nothing. If the cells inside are physically damaged or worn out from age, no fix restores that capacity, and replacement becomes the safer choice.
How do I test if my e-bike battery is bad?
Use a multimeter set to DC voltage on the battery’s terminals and compare the reading to its expected full-charge voltage. A reading far below that number, especially one that drops fast as soon as the motor kicks in, points to a battery that’s on its way out.
Why won’t my e-bike battery hold a charge anymore?
A little capacity loss over time is normal, since batteries fade gradually over hundreds of charge cycles. A sudden drop is different, though — paired with random shutdowns or a battery that gets warm for no clear reason, it usually points to aging or damaged cells rather than everyday wear.
How long should an e-bike battery last before I need a new one?
Most e-bike batteries last 3 to 5 years, or 500 to 1,000 full charge cycles, whichever comes first. Cold storage, deep discharges, and cheap chargers can shorten that window. Careful charging habits can stretch it well past average.
Final Thoughts
Most “dead” e-bike batteries aren’t dead at all. They’re asking for a clean connector, a working charger, or a little patience while the BMS resets itself.
Work through the checklist, make your repair-or-replace call with a clear head, and you’ll know exactly what’s wrong before you spend a single dollar on a new pack.